Things are taking off!

I’ve had a very productive couple of weeks and I’m super excited about it, so I thought I’d share a little of what I’ve been up to lately.

First, I officially launched my photography business on Facebook, and my web site is up!

logo-blackbkgdfacebook.com/KelleyKPhotography
www.kelleykphotography.com

I’ve already had a several friends inquire about booking sessions for their children or family, and I have a newborn shoot coming up in another week or so, for the baby of this beautiful couple that I did a maternity session for a few weeks ago!

DSC_8849

In addition to my photography stuff, the blog has been doing well. I’ve had a few really popular posts. My Teacher Appreciation Cookies post has been getting a lot of traffic this week, since it’s national teacher appreciation week. (I’m not sure why our school had it in March.) My last post about organized camping and my camping packing list was my most popular yet – it’s gotten a ton of traffic, and it’s been pinned and re-pinned on Pinterest a bunch. Exciting! And in somewhat of a surprise to me, my post about converting our old kitchen table into a kid’s playroom table has  also been very popular on Pinterest among homeschooling moms.

Finally, I’ve been getting a lot better at my regular housework AND working hard to get my office/craft room under control. My room was a complete DISASTER after my daughter’s birthday party, because I’ve never gotten it fully organized since the move last fall, and then we stuffed a lot of her stuff in my room to get it out of the way for the party, so you could barely walk in there. This week I’ve cleared the entire floor and now I just have some (big) piles of paper to sort through. For my daily housework, I’ve been really consistent the last two weeks about making the beds every morning, doing the dishes daily so the sink is empty and clean every morning, and doing a load of laundry each day – including folding/hanging it and putting it away every day. I’m trying out a new app to keep track of my to do’s, and if continues to work well for me, I’ll be posting about that soon. I’m also working on a post about the transformation in my office/craft room, complete with before and after pictures. Hopefully that will be up sometime this weekend. It’s still not going to be “done”, but I’ve made a TON of progress this week that I’m excited to share, because it’s a huge difference.

Thanks for reading my blog. Time to take on the rest of my day!

Tent Camping – Packing List & Organization

It’s finally started to get warmer here in the Atlanta area (much later than usual), and we wanted to get out and enjoy some of the beautiful Spring weather last weekend, so we went out for our first camping trip of the season. Camping is one of our favorite weekend activities here in the Spring and Fall. (Summer in Georgia is too hot for me to go camping.)

For the past few years, we’ve gone at least a few times a year, and I feel like we’ve finally really got a system down. I’ve honed our packing list down to what we really need without leaving anything out, and I’ve even figured out how to keep all our supplies organized while we’re home, so I thought I’d share my system with you all in case it was helpful to anyone else.

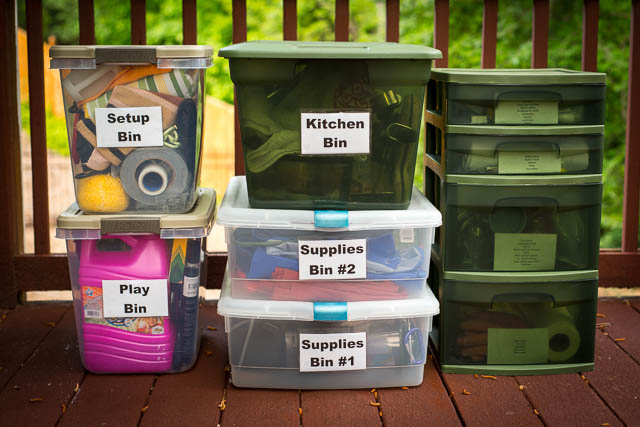
First off, I keep all our camping supplies in the basement, all on one shelving unit. Most things are stored in bins, plus there are things stored in their own bags, like tents, sleeping bags, camping chairs, and air mattresses (we camp in comfort). I love having all the camping stuff together in one place, separate from the other stuff we store in the basement.

wpid-DSC_9734.jpg

When it’s time to pack for a camping trip, the first thing I do is empty the contents of the camping shelves into the garage. Then I go through each bin to make sure everything is there. I have a master list, organized by bin, that I keep a sheet protector, so I can easily refer to it when packing or at the camp site. Each bin is also labeled with a two-sided label that has the name of the bin on the front and the contents of the bin on the back. This makes it really easy to double-check that we’ve got everything, and that nothing is missing (like stuff we used up on a previous trip, or something we had to borrow from camping supplies for another purpose).

wpid-DSC_9435.jpg

wpid-DSC_9508.jpg
View of label from the inside of the “Play” bin

As you might imagine, the Play bin is my daughter’s favorite, and it’s one of the first things to come out of the van when we get to the camp site.

wpid-DSC_9496.jpg

My favorite bin for camping is actually not a bin at all, but a 4-drawer shelving unit I bought a couple years back, specifically to organize our camping supplies. I love that it’s dark green so it doesn’t seem out of place at the camp site, since it stays out the whole time we’re camping. And the drawers make it really easy to access a lot of loose items so I’m not digging through a huge bin every time I want something small like a clothespin. I refer to this as the “kitchen” while we’re camping because it holds all the plates, bowls, cutlery, etc. The rest of the kitchen stuff in is a large bin in the same dark green that holds the bigger cooking supplies and a lot of the food. It often stays in the van while we’re camping to keep animals away from the food.

wpid-DSC_9481.jpg

Inside one of the kitchen drawers is one of my other favorite camping organizers – my cutlery roll! When we first started camping, the sound of silverware rattling around in the back of the car on the way to and from the campsite would drive me crazy! I’m not much with a sewing machine, but I had an idea to make a fabric roll I could use to store the silverware all together. My mom is a quilter, so I enlisted her help to bring my (ridiculously simple) design to reality. We used a heavy-weight white cloth napkin (like the ones found in restaurants), laid it out, and folded the bottom part up part way. Then I divided it up into equal vertical sections and marked it, and my mom se
wed the lines to create each section. Then she sewed a piece of grosgrain ribbon on the outside to hold it together when it’s rolled up. This makes it so easy to transport our camping silverware and keep it handy when it’s time to eat!

wpid-DSC_9458.jpg

And in case it would help anyone, I’ve decided to share my master camping packing list, along with a template for the labels you can modify to make your own two-sided bin labels. Click here to download it as a Microsoft Word document that you can edit, or click here to download it as a PDF if you just want to view/print it.

I’m linking this up to the weekly One Project at a Time link party hosted by A Bowl Full of Lemons!

Thanks for reading my blog. Time to take on the rest of my day!

DIY Potato Head Felt Party Game

I know it’s been quiet on the blog for the past couple of weeks, but so much has been going on! I have a new baby nephew, my daughter had her 5th birthday, and I’m working to launch my photography business.

For today though, I wanted to share with you a quick preview of a DIY party game that I made for my daughter’s birthday party. It was fun to make and a real hit with the kids. My daughter asked for an “All Disney” birthday party. She’s had Disney Princess and Tinkerbell parties the past couple of years, but this year she wanted ALL THINGS DISNEY. Perhaps inspired by our Disney Word vacation this past December, but maybe just because she has a hard time picking her favorites. Since we were inviting girls and boys, we focused on Rapunzel, Tinkerbell, Cars, and Toy Story. I wasn’t sure what to do for Toy Story, but after browsing Pinterest, I came up with the idea to make a felt Mr./Mrs. Potato Head to put on the wall and kids could just take turns arranging it however they wanted, or we could do sort of a “pin the tail on the donkey” game with it.

Since we moved this past year and still have a lot of boxes around the house, I opted to make the Mr. Potato Head from part of a large cardboard moving box, and I used Krylon Easy-Tack Repositionable Adhesive to make the felt stick, and yet be removable. Then I mounted the cardboard on two large pieces of blue posterboard, so that accessories could be attached around the Potato Head figure, and not just on it. So my daughter and I went to Hobby Lobby and bought some felt in all the appropriate colors.

Using some templates from Potato Head quiet books as inspiration, I drew out all the forms for the different parts on paper. I’m no artist, but I think I managed to get the shapes looking right. I designed at least two different options for each piece: eyes, eyebrows, ears, nose, mouth, arms, shoes, and hats. I also made a purse for Mrs. Potato Head. Then I traced them onto the felt (I used a Sharpie on the light colors and white chalk on the dark colors), and cut them out. I used Sharpie to decorate a few of the pieces (I drew lines to separate the lips and the teeth, and drew eye lashes on Mrs. Potato Head’s eyes). I also cut out smaller pieces of felt to finish some of the pieces (like black circles on the white eyes, a flower for Mrs. Potato Head’s hat, and earrings for her ears). I used Tacky Glue to glue those on so they’d stay together permanently.

Here’s the final results! A sample Mr. Potato Head and Mrs. Potato Head. Maybe I’ll add pictures of more of the pieces later, once I gather them all back up.

wpid-DSC_8899.jpg wpid-DSC_8900.jpg

Here was some of my inspiration:
http://jocelynandjason.blogspot.com/2011/11/mr-potato-head-quiet-book-pages-10-11.html
http://pinterest.com/pin/225320787579325953/

I’m linking this up to the weekly One Project at a Time link party hosted by A Bowl Full of Lemons!

Thanks for reading my blog. Time to take on the rest of my day!

I’m still here!

Sorry I’ve been absent, but it’s been a busy week…

  • I started planning Andrea’s birthday, and we made her invitations together so she could pass them out last week. It probably should have been done a week or two earlier, but at least I got them out before Spring Break. I designed them in Photoshop Elements, printed them on a color laser printer, and then cut them out with my paper cutter. Then I cut out card stock so that it would be 1/2″ taller and wider, and I used a glue stick to mount the printed invite on the card stock (with 1/4″ around each side). Andrea loved it, because she said the card stock frame made it look like a TV.
  • We closed on the sale of our old house!!! That involved pulling together all my manuals and warranty information for stuff that stays with the old house (appliances, security system, gas fireplace logs, etc.). Conveniently, I had these all in my file cabinet in a single file folder. Yay for some organization I did a long time ago that actually worked! I also typed up a document with some notes about the house that would be helpful for the new owner to know, along with a list of utility companies and contractors that we used, along with their phone numbers and web sites. The new owner was very appreciative of all of this information, and the real estate agents were really impressed with this extra step.
  • I also (mostly) finished the web site project for a customer that I started recently. The project is almost complete, and I’m just waiting on a little bit more content from the customer, but for now it’s off my to do list at least.
  • I volunteered at my daughter’s school fundraiser, a fun run. I photographed the event and then quickly processed nearly 500 pictures, shared a some favorites on the school’s Facebook page, and posted the rest to a private album for the parents to look for their students. Several parents thanked me for the pictures I took of their kids from the run.
  • I’m still processing pictures from the wedding that I shot last weekend. I’m about two-thirds of the way done, and the bride and groom are THRILLED with the preview album I showed them. It’s getting me really excited about doing more photography work in the future.
  • While we’re on the subject of my photography work, I also did some research into setting up my business. My husband and I already have an IT consulting and web design/hosting business that we incorporated, so I’m probably going to just add a “dba” for my photography business. I found the process to apply for that and printed out the forms. I’m also designing a logo/watermark to use on my images that I use when I share them online. Next step will be setting up a web site and pricing for my photography business. I already use SmugMug for my personal photo hosting, and have been very happy with them, so I’ll keep using them to host my professional photos too, but I still want a separate site for the business.

That was all last week. No wonder I didn’t have time to post more on the blog! I also had to pack, because this week is Spring Break and we flew to visit my brother and his wife, who are having their first baby. We were expecting the baby to be here before we arrived, but as is often the case with first babies, he’s taking his time, and is at least a week overdue already. While we’re waiting, we took Andrea to the slopes for some skiing. Hopefully there will be a baby here soon though. Andrea’s very excited about meeting a new baby cousin.

DSC_8005

Thanks for reading my blog. Time to take on the rest of my day!
Follow

Get every new post delivered to your Inbox

Join other followers: