Tent Camping – Packing List & Organization

It’s finally started to get warmer here in the Atlanta area (much later than usual), and we wanted to get out and enjoy some of the beautiful Spring weather last weekend, so we went out for our first camping trip of the season. Camping is one of our favorite weekend activities here in the Spring and Fall. (Summer in Georgia is too hot for me to go camping.)

For the past few years, we’ve gone at least a few times a year, and I feel like we’ve finally really got a system down. I’ve honed our packing list down to what we really need without leaving anything out, and I’ve even figured out how to keep all our supplies organized while we’re home, so I thought I’d share my system with you all in case it was helpful to anyone else.

First off, I keep all our camping supplies in the basement, all on one shelving unit. Most things are stored in bins, plus there are things stored in their own bags, like tents, sleeping bags, camping chairs, and air mattresses (we camp in comfort). I love having all the camping stuff together in one place, separate from the other stuff we store in the basement.

wpid-DSC_9734.jpg

When it’s time to pack for a camping trip, the first thing I do is empty the contents of the camping shelves into the garage. Then I go through each bin to make sure everything is there. I have a master list, organized by bin, that I keep a sheet protector, so I can easily refer to it when packing or at the camp site. Each bin is also labeled with a two-sided label that has the name of the bin on the front and the contents of the bin on the back. This makes it really easy to double-check that we’ve got everything, and that nothing is missing (like stuff we used up on a previous trip, or something we had to borrow from camping supplies for another purpose).

wpid-DSC_9435.jpg

wpid-DSC_9508.jpg
View of label from the inside of the “Play” bin

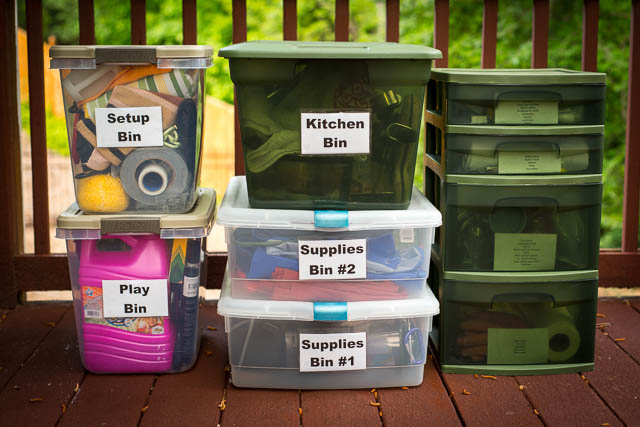
As you might imagine, the Play bin is my daughter’s favorite, and it’s one of the first things to come out of the van when we get to the camp site.

wpid-DSC_9496.jpg

My favorite bin for camping is actually not a bin at all, but a 4-drawer shelving unit I bought a couple years back, specifically to organize our camping supplies. I love that it’s dark green so it doesn’t seem out of place at the camp site, since it stays out the whole time we’re camping. And the drawers make it really easy to access a lot of loose items so I’m not digging through a huge bin every time I want something small like a clothespin. I refer to this as the “kitchen” while we’re camping because it holds all the plates, bowls, cutlery, etc. The rest of the kitchen stuff in is a large bin in the same dark green that holds the bigger cooking supplies and a lot of the food. It often stays in the van while we’re camping to keep animals away from the food.

wpid-DSC_9481.jpg

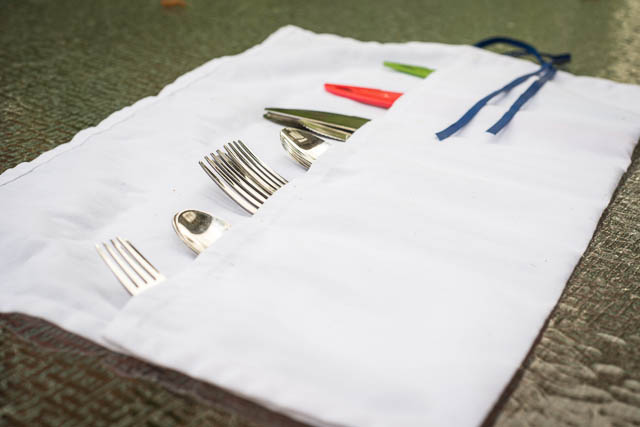
Inside one of the kitchen drawers is one of my other favorite camping organizers – my cutlery roll! When we first started camping, the sound of silverware rattling around in the back of the car on the way to and from the campsite would drive me crazy! I’m not much with a sewing machine, but I had an idea to make a fabric roll I could use to store the silverware all together. My mom is a quilter, so I enlisted her help to bring my (ridiculously simple) design to reality. We used a heavy-weight white cloth napkin (like the ones found in restaurants), laid it out, and folded the bottom part up part way. Then I divided it up into equal vertical sections and marked it, and my mom se
wed the lines to create each section. Then she sewed a piece of grosgrain ribbon on the outside to hold it together when it’s rolled up. This makes it so easy to transport our camping silverware and keep it handy when it’s time to eat!

wpid-DSC_9458.jpg

And in case it would help anyone, I’ve decided to share my master camping packing list, along with a template for the labels you can modify to make your own two-sided bin labels. Click here to download it as a Microsoft Word document that you can edit, or click here to download it as a PDF if you just want to view/print it.

I’m linking this up to the weekly One Project at a Time link party hosted by A Bowl Full of Lemons!

Thanks for reading my blog. Time to take on the rest of my day!

Kitchen Table to Kids’ Table

We moved last August and since the move, I’ve never taken the time to get my combined office and craft really functional. It had too much furniture in it, and needed more shelving. Last Friday, I had enough and started changing it all up. I was going to post about the progress I’ve made in that room, but instead decided to focus this post on the first thing I changed, which actually involved a table that I moved OUT of the room. Moving the table out and freeing up that corner of my office was the first step and it made a huge impact in my room. And I was so excited about how it turned out that it motivated me to keep working on the rest of my office.

In our old house, we had a pretty generic kitchen table with the natural wood top and white painted legs (similar to this). I bought the table shortly after graduating from college for cheap at a discount furniture store, but it worked, and it actually looked pretty nice in our last two houses. But the new kitchen has darker wood floors and cream colored wood trim, so the table was just NOT going to work anymore as our kitchen table. So I had the movers put it in my office/craft room, thinking I could work on craft projects with my daughter there. But that never happened, as she preferred to work in her playroom. So the table just took up a lot of space in my office and junk got piled on it. I also realized Andrea was outgrowing her little kiddie table that Santa brought when she was just 2. Brainstorm! I realized I could cut the legs down and move it into her playroom. It’s got a lot more real estate than her kiddie table, which is never big enough for her sprawling arts and crafts projects these days. The only problem was that I didn’t like the idea that if I cut all the legs, I couldn’t easily put it back to its original state again. So I went to Home Depot and looked for replacement table legs, but they were pricey and would have cost over $60, which was more than I wanted to spend. But then I found some primed square balusters for only $9 and they were long enough (42″) that I could buy two and cut them in half to make shorter legs for the table. So I brought them home, pulled out the circular saw and cut them in half. Then I took the legs off the old table, lined up the new legs, marked and drilled holes in them, and then screwed them in to the table similar to how the original legs attached.

Here’s the final result:

wpid-DSC_5763.jpg

My daughter LOVES it. She has so much space for her projects now and there’s room for her bins of markers, and crayons, and colored pencils to be on the table with her while she works. The table is also a little bit taller than her previous table, so she won’t outgrow it anytime soon, and it’s a little easier for me to sit with her so we can do projects together. Success!!!

The office/craft room is coming along quite nicely, but I will have to post about that later this week.

I’m linking this up to the weekly One Project at a Time link party hosted by A Bowl Full of Lemons!

Thanks for reading my blog. Time to take on the rest of my day!

Shredded Chicken Tacos

As I promised yesterday, I’m sharing my recipe for Shredded Chicken Tacos. We make this once a month or two, and I freeze the leftovers so we can have it once or twice in between making it fresh. It’s super easy to thaw and re-heat for a delicious leftover meal that tastes exactly like the first time around.

Shredded Chicken Taco Meat

  1. Place 3-4 boneless chicken breasts in a crock pot. Cover with water.
  2. Add packet of taco seasoning (I always buy McCormick brand, which is labeled “no MSG”, for what it’s worth).
  3. Cook on high 3-4 hours or low for 6-8 hours, then shred chicken with forks.

Cooking/Serving Suggestions:

  • I serve the shredded chicken on soft taco shells for myself, and put it into a quesadilla for my daughter. When she was a baby, I would just serve her the shredded chicken by itself and she could eat it as a finger food. As she got a little older, I would add some shredded cheese on top.
  • Variations call for adding green peppers, onion, and/or salsa in the crock-pot, but we never do this, because we don’t like all that stuff in my tacos. Some people even substitute the salsa for the taco seasoning all together.
  • Some recommended sides are black beans (I get the low-sodium variety for my daughter), corn,  Mexican rice, and guacamole.

And a teaser for tomorrow… This afternoon, I got it in my head that I would finally tackle a project that I had been wanting to do – re-purpose a table that was not working in my office / craft room – and I did that, but that got me started on rearranging the rest of my room. Since we moved last year, my office has been a complete disaster, and it needs a lot of attention, but I’m making some headway. My husband went out with a friend tonight and I’m going to stay up late working in here and hopefully I’ll have some progress photos tomorrow and an update on this undertaking! (I’ll also share about my re-purposed table project.)

Thanks for reading my blog. Time to take on the rest of my day!

Things are happening . . .

Rough day today, but I did have some productive parts of the day, so it wasn’t all bad. And I did learn one important lesson – sign up to volunteer for school events early instead of showing up at the last minute, so I don’t get stuck watching the 3rd graders. I have a preschooler – I’m not equipped to handle 3rd grade! LOL. I also learned that I need to keep my daughter’s ballet bag packed at all times so it’s ready to go, and she doesn’t end up getting ready for ballet class with 3 pair of pink tights, but no leotard or ballet shoes. (Did I mention it was a rough day?)

On a more positive note, I was able to wash and dry a load of laundry (my goal is to do one load of laundry each day), and I kept up with washing dishes so they didn’t pile up in the sink. I also ordered some last-minute baby gifts for my sister-in-law and for a friend, both of whom are having babies soon. Then I volunteered at the school for a few hours to help with a Teacher Appreciation luncheon.

After school, I counted up the Box Tops and Labels for Education to send in with my daughter to help her class with the school competition.  That was easy since I always put them in a little Longaberger basket on my kitchen counter (similar to this one except it has a lid). It’s one of the systems I have that has worked well to keep one tiny thing in my life organized for the past few years. And dinner was easy thanks to a thawed container of shredded chicken taco meat I pulled out of the freezer this morning. It’s one of our popular dinners around here, and one of my favorite things to freeze for leftovers.

And, in more exciting news… One of the reasons I started this blog was to help motivate me to work on my photography skills with the goal to work up to possibly doing some professional photography. Well, I found a deal online for a local photography workshop and I signed up today! In June, I’ll be doing a 3-hour children’s photography workshop with a local professional photographer. I’m super excited – I just wish it were sooner! Also today, my husband offered my services to a friend/coworker who is getting married next weekend. It’s a second marriage for both the bride and groom so they weren’t going to spend the money on a wedding photographer, and were just going to have family take pictures for them, but when Paul suggested I could go to the wedding and take pictures for them, they were over the moon and agreed to pay me to take their wedding pictures! I have no interest in becoming a wedding photographer, but I’m glad to help this couple out because I know them both and would like to help them get better wedding pictures than whatever the bride’s mother would be able to snap on whatever camera she has. Wish me luck!

Tomorrow I’ll share my recipe for shredded chicken tacos. For now, I’ve got to get to sleep. Thanks for reading my blog!

Follow

Get every new post delivered to your Inbox

Join other followers: